
Before setting up your Blogger menu, make sure that your pages or labels categories are already created. If you don’t know how to create a page or label, then follow the steps below (or skip to the “Setting up your Blogger Menu” section):
How to Create a Static Page
Step 1. To add a static pages such as “About Me” or “Contact”, access your Blogger dashboard > go to Pages.
Step 2. Click on +NEW PAGE button located on the top left corner of the screen.

Step 3. Add a title and then publish your page. You can add your content here later.
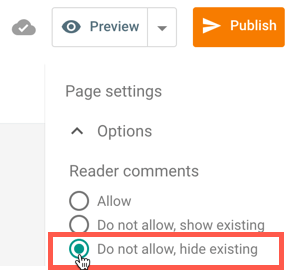
Note: If you want to disable comments on the page, click on “Options” on the right of your page editor and check the “Do not allow, hide existing” setting.
How to Create a Label Page
A label page is a page where only posts from a specific category will appear. Example: a list of posts from the Travel category will appear when clicking on the Travel label. To apply a specific label to your post:
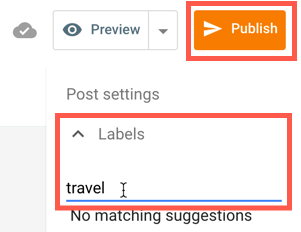
Step 1. Edit one of your blog posts > click Labels on the right.
Step 2. Type the label in the field, then click the “Publish” or “Update” button in orange on the top right corner.
Now that our Pages or Label pages have been created, we can proceed further with setting up our Blogger menu.
Setting up your Blogger Menu
1. Go to Layout > click Edit on the “Pages” widget from the MENU section.
2. To add a Static Page as a single tab, select it from the list on the left:

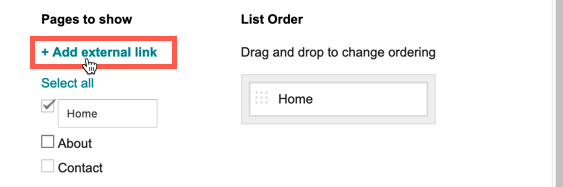
3. Or if you want to add a Label Page as a single tab, click on “+Add external link”:
4. Fill out the fields as follows:
- Page Title – type the text that you want to appear in the menu
- Web address (URL) – add the following link structure in the field: /search/label/LabelName?max-results=7
Important: Replace LabelName with the label that you added in the post editor. Keep in mind that the label is case sensitive, so if you added it with lowercase letters (e.g. travel) and the label in the web address field is written differently (Travel or TRAVEL), Blogger will ignore it and no posts will appear on this label page.
5. After filling out the fields, click on the “Save link” button in orange.
Creating a Submenu or a Drop-Down Menu
1. Go to Layout > click Edit on the “Pages” widget from the MENU section.
2. Click on “+Add external link” and fill out the fields as explained below:
- Page Title – add the text of the tab and include an underscore _ in front of it (example: _Travel).
- Web address (URL) – Add the link (it can be the link to a static page, label page, or to any external website).
3. When you’re done, click on the “Save link” button.

Important: the underscore symbol should be used only when you want to create a drop-down menu. Don’t use it for the tabs that are visible on the menu.
Note: If you want to add subpages to subpages, include two underscores instead of one (example: __Travel).
4. The pages added should appear on the right side (or below if the text contains more characters). To display the subpage under a specific tab (eg. Categories), click on the text with the _ symbol, then drag and drop it under the page you want to appear.
Live example:

5. When you have added all the pages, click the “Save” button at the end of the window and you’re done setting up your Blogger menu.